|
|
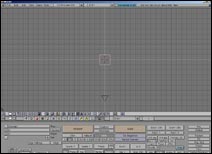
This
is how it looks like when you start Blender.
Not really appealing isn't it ? But once you get used to
it it gets quite enjoyable.
There are two main windows, one is your 3D view and the
other one contains the options for each part :
lamp, material, texture, animation, realtime, edit,

constraint, sound, world, paint, radiosity, scripts and
render.

Don't hesitate to click on each of these buttons in order
to see what they're about.
Each window has a personnal menu bar, we can change the
content of the window by clicking on the left button at
the end of each bar ( 3D view, some editors, info, sound
etc.).
A right
click on the small house allows you to choose where to put
the bar.
I'm not going to explain each button, it would be too annoying,
especially when you know each one of them has got a keyboard
shortcut. I would rather try each button to see what they
stand for, you understand quite quickly what they stand
for, and often you'll prefer the shortcuts.
For example these buttons on the left allow you to switch
to perspective mode, but you just have to use the shortcut
5 on your keyboard for the same result.
Tutorial 2 : Changing the
view
|
